Who'd u thunk that a shower curtain would evolve into a major project? ME! Raising my hand!! Because I don't do ordinary well..... OBVS. Hello, have you caught onto me yet? Yes, I could have thrown up the old shower curtain track, (I can't believe I actually held onto that grungy piece of plastic this long just in case my idea didn't work! You want it? It's yours for shipping....) and I also could have bought a ready made curtain and cut it down. However, I saw this curtain at Anthropologie a year ago and fell in love with it.
I pinned it ( Pinterest is soooooo evil, it makes me do things....) Here's my version. UGH I wish I had ironed it before I took this pic. Imagine it ironed folks!
Did I make all those tassels by hand? YEP! I used embroidery thread in the same colors as the pendleton blankets (cause matching counts, LOL). The fabric is just a duck type canvas. I added three rows of horizontal pleats so I'd have something sturdy to attach the tassels to and hide all the knots underneath.
The shower curtain rod I bent out of 1/2 inch copper pipe. I made a jig like this that followed the curve of the tub.
The first time I tried to bend the pipe, I filled the it with sand that was a maybe little too coarse and there were some voids (or I got a little too aggressive) and the pipe kinked. DANG!
The second time I filled it with salt (yes, I washed it out really well after) and it worked like a charm. The pipe actually bent pretty easily. I used copper bell hangers to attach it to the wall . Where it attaches to my copper covered wood bulkhead wall I bolted it through with a fender washer on the other side. Attaching to the fiberglass endcap was a little trickier because I was afraid it would pull out. I ended up epoxying a circle of aluminum to the fiberglass, reinforcing it with a few rivets and then screwing the bell copper hanger through that.
I thought I might have to extend a support from the ceiling but with the three hangers it seems secure enough. No monkey bar swinging on it but ...
Rear mount with a 90 degree fitting and a small straight run of pipe
Front mount bolted thru wall. with a 45 degree fitting and another small straight return
I tried E6000 glue for the fittings but it didn't work. I then used some Gorilla Glue clear 5 minute epoxy which did the trick!
The copper hooks were actually fun to make, I built another jig. Drew the basic shape I wanted with a sharpie on a scrap piece of wood, drilled two holes with a forstner bit, added a couple of pieces of a 1/2 inch wood dowel and voila! I bought 8 gauge copper grounding wire from a big box store for the actual hooks. Bolt cutters to cut, and a dremel with a grinding bit to burnish up the ends . Pretty simple and about $5 in materials.
I even figured out if a hang a few hooks backward they can be used as towel hangers! Sweeeet.
I liked this shower curtain so much I made a room divider just like it #totallysickofmakingtassels. It's on a spring curtain rod so we can use it to cordon off the bath area or use it up front when I want to read and my husband wants to sleep. I'm kinda a night owl! Yes, my tub is on the bed, its a work in progress, deal with it!
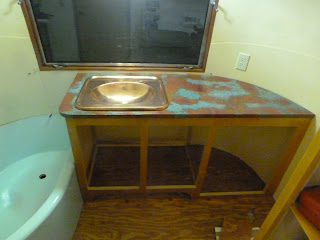
In other matters, my kitchen cabinet/counter is coming along nicely. And we've started the fresh water plumbing which is beyond exciting. A couple of fast questions for you all. How do I secure the fresh water tank to the floor? I have VERY limited space.
And where do I put the fresh water campground intake faucet? Point me to your pictures of such. I'm assuming in the back left belly pan area?
Lots more to come soon I promise!
The first time I tried to bend the pipe, I filled the it with sand that was a maybe little too coarse and there were some voids (or I got a little too aggressive) and the pipe kinked. DANG!
The second time I filled it with salt (yes, I washed it out really well after) and it worked like a charm. The pipe actually bent pretty easily. I used copper bell hangers to attach it to the wall . Where it attaches to my copper covered wood bulkhead wall I bolted it through with a fender washer on the other side. Attaching to the fiberglass endcap was a little trickier because I was afraid it would pull out. I ended up epoxying a circle of aluminum to the fiberglass, reinforcing it with a few rivets and then screwing the bell copper hanger through that.
I thought I might have to extend a support from the ceiling but with the three hangers it seems secure enough. No monkey bar swinging on it but ...
Rear mount with a 90 degree fitting and a small straight run of pipe
Front mount bolted thru wall. with a 45 degree fitting and another small straight return
The copper hooks were actually fun to make, I built another jig. Drew the basic shape I wanted with a sharpie on a scrap piece of wood, drilled two holes with a forstner bit, added a couple of pieces of a 1/2 inch wood dowel and voila! I bought 8 gauge copper grounding wire from a big box store for the actual hooks. Bolt cutters to cut, and a dremel with a grinding bit to burnish up the ends . Pretty simple and about $5 in materials.
I liked this shower curtain so much I made a room divider just like it #totallysickofmakingtassels. It's on a spring curtain rod so we can use it to cordon off the bath area or use it up front when I want to read and my husband wants to sleep. I'm kinda a night owl! Yes, my tub is on the bed, its a work in progress, deal with it!
In other matters, my kitchen cabinet/counter is coming along nicely. And we've started the fresh water plumbing which is beyond exciting. A couple of fast questions for you all. How do I secure the fresh water tank to the floor? I have VERY limited space.
And where do I put the fresh water campground intake faucet? Point me to your pictures of such. I'm assuming in the back left belly pan area?
Lots more to come soon I promise!


