Thursday, October 16, 2014

Bug it!

This is a leak free workplace.  It has proudly been ZERO days since the last incident!

Yep, well ...yeah, another leak, sigh.  A couple weeks back I sealed one long roof seam with Acryl R and the other long roof seam with Tempro 635.  Just doing my best for you all in the name of research.... The plan was to check them in the spring to see which held up better.

Well the Acryl R seam was leaking in at least two areas.... and winter is coming (said in my very best Game of Thrones imitation).   So I got up on the roof, removed the Acryl R and used Trempro 635.  It rained last night and I was worried about whether it had cured.  So I grabbed my camera and when I looked at the roof seam I see this.  Ignore the morning dew, concentrate on the seam, this was about 6 inches of it.

Every mother-loving black fly left in the Northeast committed suicide on my roof seam.   LITERALLY hundreds.  It was like 40 degrees, there shouldn't have been ANY black flies with 100 miles of my roof!

Well they better "wear off" cause I'm not doing it again. Just saying.

Update, well it POURED 2 inches today, think I got this licked, the only thing that leaked was where the wind blew it in the refrigerator roof vent.  Might have to think of someway to put a waterproof pan under the frig.

PS  Yes, I checked, the bugs are still there :(

Monday, October 13, 2014

A Eureka moment!!

As in ....we have light!   There probably are other things I should write about first, but tonight was very exciting!  Peter finally wired the last light (the license plate light)  and we have LIGHTS! YIPPEE!

Proof by picture...


As in all great epiphanies,there was a lot of work that led up to this moment.  Here's Peter wiring in the last light,  surrounded by a summers worth of insulation work, rib taping and electrical.   And then there was the reworking of all the lights to make them LED, and installing them!
 The batteries are going in the front of the trailer, so this is going to be my 12 volt Power central!  The seven way wires come into a junction box.  I know the truck would be fused but does anyone also add fuses to the junction box to protect the truck?

All the teardrop grounds are accessed from outside the trailer.  The Stop/tail/turns are grounded to the inside ribs.  If need be, I left enough wire so that they could get pulled and an outside ground added if there are issues.

We still don't have a truck (waiting on seeing the new aluminum Ford trucks) so we used one of these to test it
And following the instructions on this youtube video on how to test the Bargman plug,  I'm sure some of you are snickering about needing instructions...YOU BE QUIET!
https://www.youtube.com/watch?v=G-VYf5MltgI

Anyway, I'm as happy as a bird with a french fry!

On a side note, I found a new product that's really kinda cool,   If you notice in the picture of the lights, my license plate light is installed way off to the left on a curved side section of metal.  This is because I still intend to put the tire in a continental kit on the back bumper.   But I needed a gasket that was bigger on one side than the other, and narrower in the center.  Yes,  I probably could have built up some buytl tape but I was looking for something a little more elegant.    What I found was a moldable gasket material called Versimold.

This stuff is cool!   This is the gap before I had a gasket.


Basically you mold it, shape it, then cure it in the oven (or with a heat gun) and it becomes a custom gasket. 

The first time I tried to remove it from the light to cure it..... but it got stretched out and didn't fit nicely enough.  The second time I left it on the light and put the whole thing in the oven with much better results. Sweet!   Best of all I gave it the hose test and no leaks!
.
This light is grounded by the screws.  But I did manage to find an LED bulb that fits.  LED's don't like water but this is sealed in the little glass cylinder so hopefully it will be okay.  I used  this one.

That's all for now!  I love my lights 


Sunday, September 21, 2014

Endcap redux

A major milestone is looming ( ie getting the skins back in) so  it is time to work on the endcaps as they are the first pieces to go in.

The biggest change is that I despised the molded shelf in the front.  To me it looks clunky and way too modern.  And since the current plan is having  wood end caps it had to go!  By the way, all that speckling in the photo is not zolatone, its mold and crud and schmegglies.

No, I did not make that word up! According to the urban dictionary its a piece of dirt, grime, or grotesqueness that appears on a object or often ones self. I like to use it as a term of endearment, but do that at your own risk!


Usually I start with hand tools,  and progress up the chain of evolution for tools.  I like the control I get from hand tools.  I started with a coping saw but it didn't fit next to the curved shell,  I moved on to a flexible hand saw but the fiberglass was chewing up blades and spitting them out....Should I now confess that I actually first started with a exacto knife ?  I was clueless to the relative hardness of old school fiberglass!


Okay, onto power tools, my dremel with the right angle attachment and this bit did an okay job but didn't really have enough power and the bit was bogging down.  By this time, my lawn had tools and blades scattered all over it and I was 3 hours into a job that I thought would be 30 minutes top!  AND I was maybe only a third of the way done . :(


Out came the big boy,  my rotozip.  Another trip to the hardware for a new bit (I think this was my third trip for blades of various types!)   Honestly, I think I cut the rest of the shelf off in under 5 minutes! Obviously the right tool for the job, huh.... I used the regular bit for wood and plastic.

A little trimming with a grinder stone on the dremel and DONE! If I get the time I may patch this up and smooth it over.  Or I may just leave it ugly and consider it my motivation to do the wood end cap!

Then I cleaned and sealed both endcap backs with West system Epoxy, just like the floors.  Unfortunately, no amount of scrubbing was going to get these clean.  I'm happy I took the time to do this because they no longer have that peculiar pungent pee smell.  Go ahead say that ten times fast I dare ya!

Then onto the fronts, despite my fears they'd dissolve into a pile of goo,  I used Citrastrip to get the paint off.   Lots and lots of plastic razorblades later....


 This angry little fellow watched me the whole day....What am I? Squirrel television? Gheesh. It's funny he happily coexists with the large garter snake that lives under my front doorstep.  They even use the same tunnels! 


Tuesday, September 16, 2014

Who goes here?

I found something really exciting when I was cleaning up the interior wheel wells.  Someone had written something on the fiberglass.  I've seen other peoples posts about  uncovering cool notes and signatures inside the walls of their Airstreams.  At one point, I considered taking apart my door because it is often signed by one of the workers....then I came to my senses!

Anyway, I thought how cool!  I finally have something!  The trouble was I couldn't read it as they signed the backside of the wheel well and plated over it with a piece of aluminum ,so it was a very faded mirror image I was seeing from underneath .  Nothing would do except taking it all apart!!!!  So I did!  Once I wiped all the grime off I could finally see what it said....wait for it...


 Can you see it?   Come a little closer....


Now?      It says "REJECT"   Well, that sucks....just saying....

The search for evidence of her builders continues.  I need to think about how to leave my mark for future owners ....


Thursday, September 11, 2014

Other little stuff

I polished and added two vents to the roof, I think they are quite jaunty and,  unlike the originals, these are aluminum, so no rust!  I used Eternabond double stick tape as a sealant leaving a gap at the bottom.  I also drilled two little holes at the bottom so if any water does builds up it will drain out before it reaches the vent stack.  I would have preferred to buck rivet these but as they will likely come out in the future I went with # 8 stainless screws for now.


I added the Marinco outlet. By the way, I used a rubber gasket that I cut last year turned out it was already cracking so I found this at the local Orange Box store, closed foam seal, fit perfectly, even the screw hole punched in the foam lined up!   They also fit perfectly under the wedding cake tail lights.  I'll re-purpose the metal plate that came with them.
-

Also added the scare light.  This area of the trailer has the most corrosion and I thought about adding a custom patch but in the end I left well enough alone.  I had a problem with the bottom hole being stripped out so I bought a piece of aluminum stock bar at the Orange box store, drilled a new hole and installed it as a backer to the bad hole with Tempro 635.  The scare light itself I bedded in butyl tape and followed up with a seal of Tempro 635.  I already installed the LED light upgrade. 


I also got the gaps underneath sealed up and polished the new rubrails from VTS.  They are going to add a lot of bling to the trailer!  The old ones were mangled, I probably could have fixed them up but took the easy way out.  I haven't installed them yet.  I don't find it very amusing that right when I get my trailer leak free (said with pinkies crossed) I've got to drill a bunch more holes into the skin!


I also got all my window hardware cleaned up and reinstalled.  I painted them with Rustoleum Hammerite smooth aluminum paint #42205 .  They came out SWEET!

Before and after


This paint is really cool and durable.  Its hard to find though and I had to resort to buying it online.   I've also discovered its a perfect  match for POR's sterling silver paint that I did the hitch in..  Great for touch ups!

No leaks again in the trailer DESPITE torrential downpours and a tornado warning.  Yep, tornado.  Turns out we didn't have an actual tornado but two streets over there was a micro burst with winds of 110 mph an hour.  Took down lots of trees and our power.   I was more concerned about the hail warning,  which never materialized.  In the middle of the tornado warning,  I'm down in the basement eyeing the leftover roll of Prodex and wondering if I could rig a temporary cover LOL!  Or throw myself over those endcaps if need be! 


Tuesday, September 2, 2014

Today was a red letter day!


 A couple of days ago my son and I did some Hillbilly leak testing.   Basically, I put him in Moonraker with a shop vacuum hooked up to blow instead of vacuum.  I sprayed the outside areas that I suspected with soap and water and sure enough, we had bubbles. 


I recently sealed the two long seams on the roof, as well as hitting every rivet on the endcaps with Captain Tolleys.   The worst area was around the jalousie window.  I've been fighting this leak by my door for a while.   I dug out the new Tremco, and filled it with Acryl -R.  It wicked in and appeared to work because today we had a huge rainstorm and I had this.


Okay, the rain sounds more like static but.......A LEAK FREE trailer!!!!!!   For the first time since I've owned her.   

AND that's not all.......   I also cut my last piece of insulation today :)   
It was epic..... in Lord of the Rings "Thou Shall Not Pass" kind of way. LOL

Friday, August 29, 2014

Blogging about the little stuff..... and playing catch up!

Its been nice to finally put some things back on Moonraker!

New badges, lights and plates:


I finally ended up using this paint to replicate the original golden frames.  It's color number SP404 gold flake.


 It's an automotive paint that got "cured" in the oven at 200 degrees for an hour,   we'll see if it ends up being durable or not.   I did clearcoat it after it was cured.  Of course, I waited to use the oven until my husband was away on a business trip.  Don't judge.

LED lights - They have all been switched out and rewired with closed sealed LED's  much like  Reggiemon  did on this post.  No more worrying about corrosion at the bulb.  And being sealed LED's,  I'm not going to have to seal the teardrop lights at all.  I want water to flow thru, not get trapped behind the light.

  What about the wiring hole you say??   Well, that actually worked out really great, I drilled a new hole in the VTS base plate with a step drill and used a grommet that goes on that hole AND the hole on the trailer.

 We've had some really awful rain storms and they don't leak at all.  I will seal the wires with a glob of Eternabond doublestick tape anyway.


Drilling the hole -   You need to have wood underneath because the metal is extremely soft.

 By the way,  it won't come as a surprise to you that every hole was in a different spot.  That meant clecoing a teardrop fixture in place, going in the trailer and tracing the hole, every one by ever luvin' one.  And then labeling them so I knew what goes where.


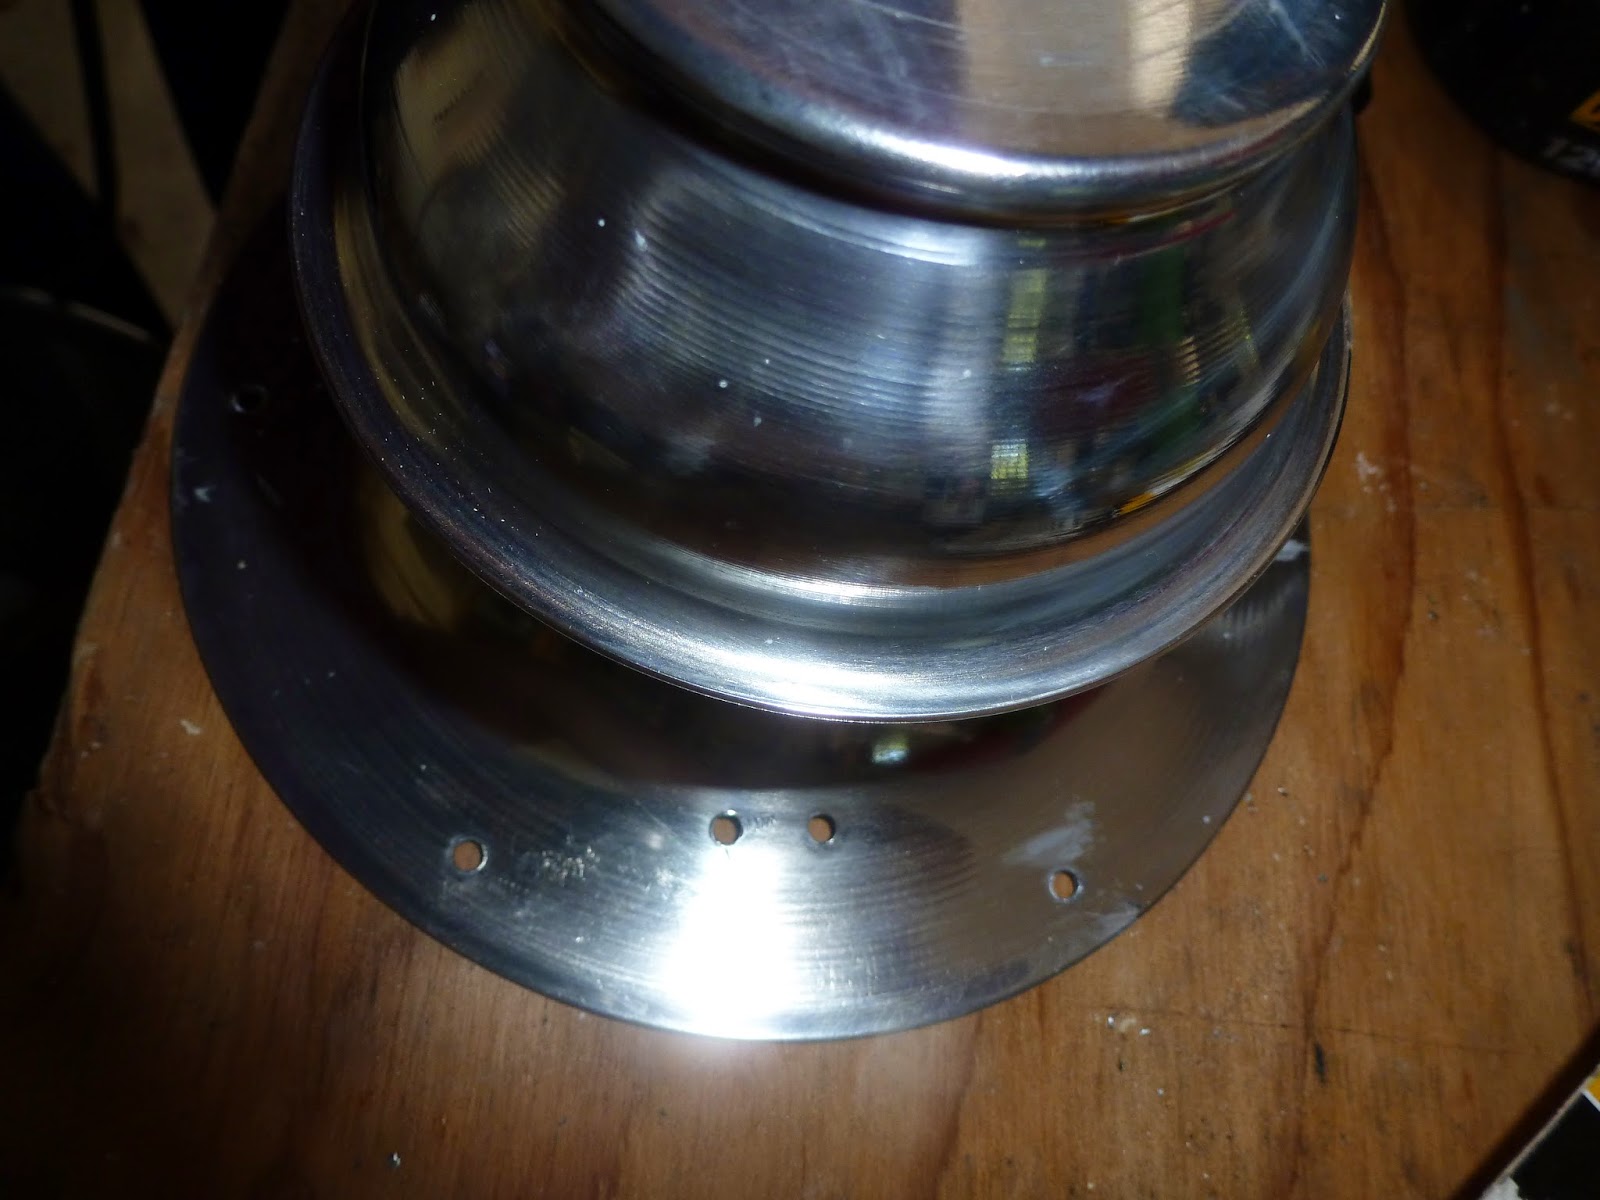
A new roof refrigerator vent:

I must say, my hole is a lot less ragged than the one cut by the factory,  I used a Harbor Freight hand nibbler.
 I used butyl tape to seat the vent and riveted it in place with closed end pop rivets and covered it with Sikaflex221.
 I used closed end pop rivets on this vent cover too.  The vent is aluminum but needed to be cut down as it was too large.  I used these instructions.

By the way, this cover was clearcoated with some uber strong Martian spit.... clearcoat, that is!  Three applications of Aircraft stripper and I finally broke down and sanded the rest off before I polished it.

I really didn't want to make something that looked like a patch.  Colin Hyde suggested that I open up the rivets at the top seam and the awning rail and slip the patch top and bottom seams underneath.  This was a great idea and it really makes the patch less visible.  That is, it would be if the patch would hurry up and corrode a little!  It's too shiny!   Special thanks goes out to Anna, my daughter, for bucking all the rivets with me. I shot it all wet with Trempro 635 (not fun) and she had it dripping down on her in the trailer.  This doesn't make a young woman with super expensive highlighted hair happy!  Phhhht.  Also a shout out to Wayne R, whom I got the refrigerator collar from. Thanks Wayne.

Only had one moment of high anxiety when I picked up the vent cover to put it up on the roof and realized that I had never test fit it!   It would have been really bad if the vent had ended up being even a smidgen longer.  As it was, it fit exactly on the 2 foot length of the patch.  I have no clue why I never considered this!!!!  Some fancy planning of where the rivets could go so they don't land on top of the patch rivets and a near disaster was averted....
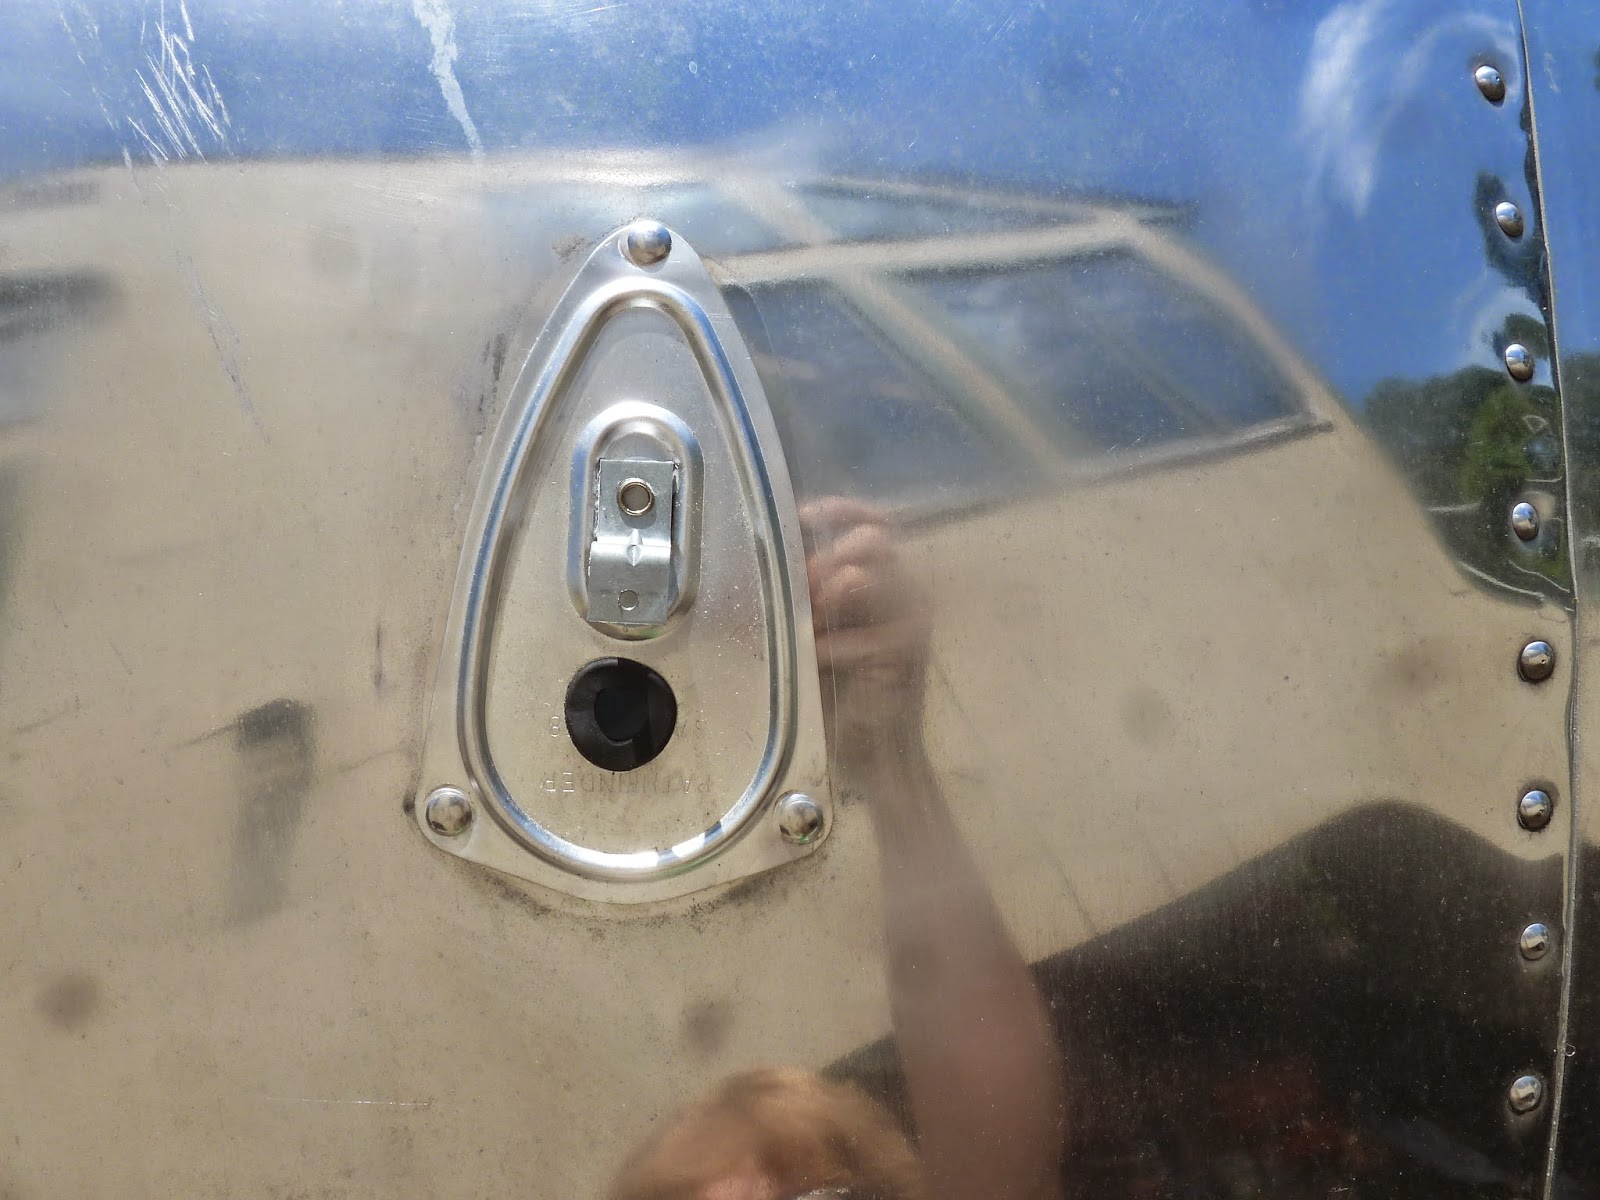
CG Antenna:
Installed a new CB radio antenna, I'm planning on putting a mobile CB unit in that can be shared with the truck.  Of course the only thing I know about CB's I learned from Smokey and the Bandit!   "Snowman, what's your 20?"   I don't even have a clue what kind of cable/wire to attach to this antenna!!!  I need to figure that out before I put my skins in.

A Jalousie window makeover.  Hand polished frames, new seals , retainer discs, mouse fur.....etc.  Honestly this took the better part of a week! 

My sill was completely corroded.  This is not dirt, its corrosion!
 So I broke out this bad boy and chucked it in my drill, its a 3m maroon scotch brite sanding disc.  These frames are all aluminum so I could get pretty aggressive.
 Not perfect but much much better!
While the window was time consuming and tedious, the only difficulty I had was inserting the strips of fur on either side of the window.  I had just sat down with a pair of scissors thinking that I would have to trim it when  I realized the the fur is directional,  the fur has to point down if that makes any sense otherwise you can't slip it up from the bottom and past the window panes.  Its a very tight fit, but that's good!  It means it will be leak free right? Yeah right.   I also found one of my more pesky leaks, I thought it was coming from the door seal but it turnd out that it was where all the water from the eyebrow dumps on the window gutter.  The area under the gutter was just funneling it into the trailer.  Patooey on this design!!!


Fan:
I replaced the fan motor and cleaned up and painted the fan cover.  Unfortunately, the springs that hold the cover open outside are broken, I tried finding new ones but am not having any luck, Anyone have a source?  


 This is the broken spring. The knob next to it was an trigger for the fan to turn on. I think for now I'm going plug all the holes and rig a way for the door to prop open when I use the stove.


What else?   Does wrestling with jurassic weeds count? Look at the size of the root on this monster! I know the picture doesn't give it perspective but it was easily 4 feet long!

Or saving little baby birds?  This little guy hit my trailer and I'm proud to say, I scooped him up first and placed him in a safe place before Finn could get at him.  THEN I checked for damage to my trailer!!!  While I was contemplating how I was going to manage feeding him every four hours into my schedule, he recovered and flew off. Phew!


There's more to come...... trailer related stuff that is...

Monday, June 30, 2014

Its not that I haven't been working on her.....

Its been awhile!

I have slowly started to put things back on the Airstream, lights, badges, vents and so on, so I can finish with the insulation and move on to wiring. 

I'll post more about the progress, with the obligatory photos to prove it, but for now I need a little help!

One of the things I've been doing is putting back on the chimney vent that some previous owner took off.  They did a really awful patch job on it, using huge pop rivets. Don't worry,  they compensated for the pop rivets by using plenty of sealant. Ugh

How bad you say?  This bad....                       think it leaked? Yep.


This is AFTER all the sealant has been removed (at least 4 different types because one  is never enough). There's a boatload of discoloration.


I haven't tried to polish it yet (because we are in the midst of our one week a year that we get 90 degree weather)  but even assuming I can get a decent enough finish on it, there are still about 30 holes from the previous job .

The holes aren't your standard 1/8 inch or 5/32.  They are just a hair under 1/4 inch, and in two places (bottom right and left) they are two holes really close together. The only thing I can think of to do there would be to put one flush rivet in and a normal one.  Of course I don't have what I need to do a flush rivet either. 

So my choices are to try and fill the holes with something, or put another patch up there.   I was leaning toward a patch but the thought of having to make it even bigger and put a whole bunch more holes up there is making me hyperventilate. Plus call me vain but I want a patch free trailer! Sheepishly, yes I know it's on the roof.....

The inside skins are off so I could probably use 1/4 inch olympics and seal from the back.....

Any other idea's/opinions?

The good news is I've cleaned up an old vent collar and cut down an aluminum vent cover for this.  I'm excited to get this looking the way it should!