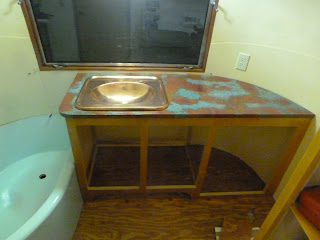
Next on the list was the bathroom cabinet. Here's the fame I built out of 1x2 popular and the Kreg jig.
I wasn't super happy with the how blocky it felt. The original plan was to make the front left edge (next to the tub) rounded but unfortunately the tub had a raw fiberglass edge that wouldn't have been covered. Instead I added this detail.
I'm in love with the rounded toe kick detail, hopefully I can do this on the kitchen cabinet also. All the seams will get covered up when I skin it with 1/4 inch BB.
The top was templated in luan and then cut with a jigsaw out of 1/2 inch plywood.
After much debate I centered the sink on the window and the light and blithely ignored the fact that it wouldn't be centered on the cabinet doors beneath. My husband and I disagreed on this but it's one of the perks of being the builder! I get to decide!
The counter is covered with the same copper I used in the shower area. The copper went on using contact cement, thus LOTS of dowels. It actually is very easy to cut using regular scissors. While the company says you can roll out any creases in my experience this didn't really work very well. It definitely is a material that will show some dings and creases. If you bend it over a sharp edge the patina will crack off so I used an 1/8 inch roundover bit in the router to route the side and front edge. The counter surface is certainly not pristine, but in my mind it has charm and character. After installed, I hit it with a few coats of their Copperlac (lacquer) which dulled it a tiny bit but should improve durability. I did experiment with Minwax laquer but it didn't seem to go on as well as their proprietary product.
After cutting out the opening, wrapping the sides and stapling underneath.
The cabinet was covered with 1/4 inch BB (glued and brad nailed) and all the openings and edges trimmed with a flush cut bit in the router.
Dun dun dun dun duuuuuuuun! Sahhhweet!
And the finished cabinet........well, minus the doors and shelves. And faucet....SighI'm getting really excited at being at the point where running water is in sight! Got the water tank in this past week from Vintage trailer supply. Quickly figured out that it should have been one of those things that went in BEFORE the bed. LOL.
Has anything around here even once gone the way I saw it happening in my head?
(That's rhetorical. Obviously.)


No comments:
Post a Comment